
Flow
In the Flow panel a number of Routines can be combined to form an experiment. For instance, your study may have a Routines that presented initial instructions and waited for a key to be pressed, followed by a Routines that presented one trial which should be repeated 5 times with various different parameters set. All of this is achieved in the Flow panel. You can adjust the display size of the Flow panel (see View menu).
Adding Routines
The Routines that the Flow will use should be generated first (although their contents can be added or altered at any time). To insert a Routines into the Flow click the appropriate button in the left of the Flow panel or use the Experiment menu. A dialog box will appear asking which of your Routines you wish to add. To select the location move the mouse to the section of the flow where you wish to add it and click on the black disk.
Loops
Loops control the repetition of Routines and the choice of stimulus parameters for each. To insert a loop use the button on the left of the Flow panel, or the item in the Experiment menu of the Builder. The start and end of a loop is set in the same way as the location of a Routines (see above). Loops can encompass one or more Routines and other loops (i.e. they can be nested).
As with components in Routines, the loop must be given a name, which must be unique and made up of only alphanumeric characters (underscores are allowed). I would normally use a plural name, since the loop represents multiple repeats of something. For example, trials, blocks or epochs would be good names for your loops.
It is usually best to use trial information that is contained in an external file (.xlsx or .csv). When inserting a loop into the flow you can browse to find the file you wish to use for this. An example of this kind of file can be found in the Stroop demo (trialTypes.xlsx). The column names are turned into variables (in this case text, letterColor, corrAns and congruent), these can be used to define parameters in the loop by putting a $ sign before them e.g. $text.
As the column names from the input file are used in this way they must have legal variable names i.e. they must be unique, have no punctuation or spaces (underscores are ok) and must not start with a digit.
The parameter Is trials exists because some loops are not there to indicate trials per se but a set of stimuli within a trial, or a set of blocks. In these cases we don’t want the data file to add an extra line with each pass around the loop. This parameter can be unchecked to improve (hopefully) your data file outputs. [Added in v1.81.00]
Loop types
You can use a number of different “Loop Types” in PsychoPy®, this controls the way in which the trials you have fed into the “Conditions” field are presented. Imagine you have a conditions file that looks like this:
letter
a
b
c
After saving this as a spreadsheet (.xlsx or .csv), we could then add this to the “Conditions” field of our loop. Let’s imagine we want to present each letter twice, so we set nReps to 2. We could then use the following Loop Types:
Random - present a - b in a random order, because we have nReps at 2, this would be repeated twice e.g.
[c, a, b, a, c, b]Full Random - present a - b in a random order but also take into account the number of nReps. Here, imagine that rather than having 3 items in the bag that we sample from, and repeat this twice, we instead have 6 items int he bag that are randomly sampled from. This would mean that with fullRandom, but not random, it would be possible to get the following order of trials e.g.
[a, a, b, c, c, b]- notice that a was sampled twice in the first 2 trials.sequential - present the rows in the order they are set i nt he spreadsheet. Currently PsychoPy® does not have inbuilt support for specific randomisation constraints, so if you need a specific pseudorandom order, preset this in your spreadsheet file and use a “sequential” loopType.
staircase - for use with adaptive procedures, create an output variable called
levelthat can then be used to set the parameter of a stimulus (e.g. it’s opacity) in an adaptive fashion. This allows researchers to converge upon a participants threshold by adjusting the value oflevelin accordance with performance.interleaved staircases - for use with multiple staircases that are interleaved. This can also be used to implement other staircasing algorithms such as QUEST (Watson and Pelli, 1983) via
QuestHandler.
Using a Staircase
Using a staircase procedure to control your loop allows the implementation of adaptive methods. That is, aspects of a trial can depend on (or “adapt to”) how a subject has responded earlier in the study. This could be, for example, simple up-down staircases where an intensity value is varied trial-by-trial according to certain parameters, or a stop-signal paradigm to assess impulsivity.
To use a staircase, you’ll need to set a ‘correct’ and an ‘incorrect’ response to the stimuli in your experiment. This is because the estimate produced by staircases is dependent on your participant’s responses; the value will decrease when a participant is ‘correct’ and increase when the participant is ‘incorrect’.
There are currently three types of staircase in PsychoPy:
Simple
QUEST
QUEST Plus
You can add just one of these staircases, or you can choose to interleave two or more.
Only QUEST is currently supported for online use.
Using a simple staircase
A simple staircase allows you to input the step sizes that you want the staircase to take when a user gets an answer correct or incorrect.
To add one simple staircase
To add just one simple staircase, you’ll firstly need to add a loop around the routines you want to repeat. Then, from the loop type drop-down list select “staircase”:

You’ll now see a list of parameters:
nReps: The minimum number of trials in the staircase. If the staircase has not reached the required number of reversals then it will continue.
start value: The initial value for the staircase.
max value: The largest legal value for the staircase, which can be used to prevent it reaching impossible contrast values, for instance.
min value: The smallest legal value for the staircase.
step sizes: The size of steps as a single value or a list. For a single value the step size is fixed. For a list the step size will progress to the next value at each reversal.
step type: The type of steps that should be taken each time:
‘lin’ - This will simply add or subtract that amount at each step.
‘log’ - This will add or subtract a certain number of log units at each step (note that this will prevent your value ever reaching zero or less).
‘db’ - This will add or subtract a certain number of decibels at each step (note that this will prevent your value ever reaching zero or less).
N up: The number of ‘incorrect’ (or 0) responses before the staircase level increases.
N down: The number of ‘correct’ (or 1) responses before the staircase level decreases.
nReversals: The minimum number of reversals (i.e., times that the staircase changes direction when an answer is correct/incorrect) that must occur before the staircase ends.
Complete these fields as required for your experiment and click OK to save the loop.
Now that you have your conditions set up, you will need to use the estimates that are being produced by the staircase to control the particular aspect of the stimulus that you’re investigating (contrast, or opacity for example). To do this, simply use the variable $level as the value for that parameter and set every repeat!
To add more than one simple staircase
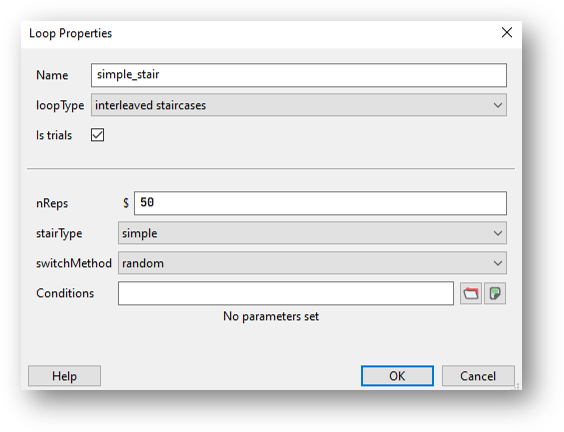
To add more than one staircase, add a loop in the same way as above but select “Interleaved staircases” from the loop type drop-down list, then “simple” from the stair type drop-down:
Set nReps to the minimum number of trials to run.
Next, use the switch method drop-down list to select whether you want to switch between your staircases sequentially or randomly. Let’s imagine that you have four staircases that you want to interleave. Choosing sequential would mean that on the first trial staircase one is used, on the next trial staircase two is used, then staircase three followed by staircase four. Then we go back to staircase one on the fifth trial. Choosing random would randomly choose from one of the four staircases to use on each trial.
Now, you’ll need to create a conditions file that contains the following column headers:
label: So that you can distinguish between the different staircases in your data output, add a label column containing a name for each of your staircases.
nReps: The minimum number of trials in the staircase. If the staircase has not reached the required number of reversals then it will continue.
startVal: The initial value for the staircase.
maxVal: The largest legal value for the staircase, which can be used to prevent it reaching impossible contrast values, for instance.
minVal: The smallest legal value for the staircase.
stepSizes: The size of steps as a single value or a list. For a single value the step size is fixed. For a list the step size will progress to the next value at each reversal.
stepType: The type of steps that should be taken each time:
‘lin’ - This will simply add or subtract that amount at each step.
‘log’ - This will add or subtract a certain number of log units at each step (note that this will prevent your value ever reaching zero or less).
‘db’ - This will add or subtract a certain number of decibels at each step (note that this will prevent your value ever reaching zero or less).
nUp: The number of ‘incorrect’ (or 0) responses before the staircase level increases.
nDown: The number of ‘correct’ (or 1) responses before the staircase level decreases.
nReversals: The minimum number of reversals (i.e., times that the staircase changes direction when an answer is correct/incorrect) that must occur before the staircase ends.
You’ll then need to input values for each of your staircases. For example:

Fig. 6 This example has two staircases, one that will start with a high spatial frequency and one that will start with a low spatial frequency.
Use the variable $level in exactly the same way as you would with one staircase - this will update on every repeat automatically.
Using a QUEST staircase
Rather than setting the step sizes manually, as with a simple staircase, the QUEST staircase procedure produces estimates that are based on the stimuli and the observer’s responses in the preceding trials. Watson and Pelli (1983) reported QUEST which uses a Bayesian method to estimate the position of the psychometric function. For full information please see their paper in the first instance.
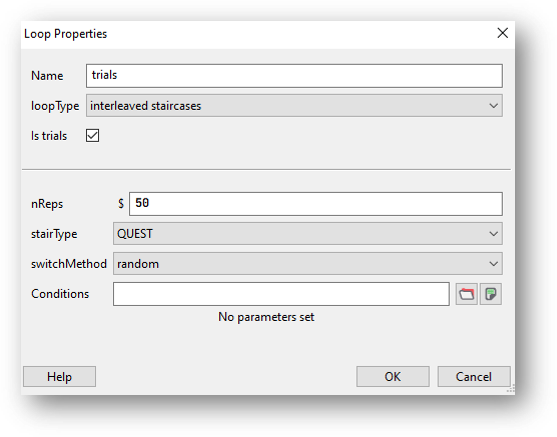
To add a QUEST staircase, you’ll firstly need to add a loop around the routines you want to repeat. Then, from the loop type drop-down list select “Interleaved staircases” and “QUEST” from the stair type drop-down:
Set nReps to the minimum number of trials to run.
If you’re using more than one staircase, use the switch method drop-down list to select whether you want to switch between your staircases sequentially or randomly. If you’re only using one staircase you can just leave this set to the default value.
Now, you’ll need to create a conditions file that contains the following column headers/variables:
label: The label given to the staircase.
startVal: The initial value for the staircase.
startValSd: Standard deviation of your starting guess threshold. Be generous with the SD as QUEST will have trouble finding the true threshold if it’s more than one SD from your initial guess.
pThreshold: Your threshold criterion expressed as probability of response==1. Typical values for pThreshold are: 0.82 which is equivalent to a 3 up 1 down standard staircase; 0.63 which is equivalent to a 1 up 1 down standard staircase; 0.5 in a yes-no task and 0.75 in a 2-AFC task
method: The method used to determine the next threshold estimate to test. Choose from ‘mean’, ‘mode’ or ‘quantile’. The default value is quantile.
beta: This controls the steepness of the psychometric function (or slope).
delta: This is the lapse rate - the fraction of trials that the participant lapses attention and guesses blindly. The default value is 0.01.
gamma: The value that is scored while the participant is guessing. Watson and Pelli (1983) state that “The parameter gamma specifies the probability of a success at zero intensity: for two-alternative forced choice it is 0.5, for n-alternative forced choice it is n to the -1 ; for yes-no, it is the false alarm rate.”
grain: Grain: This is the quantization (step size) of the internal table, e.g., 0.01.
minVal Use this along with maxVal when running the staircase locally (i.e., not online): The minimum value that the staircase will return (good for preventing impossible contrast values, for instance).
maxVal Use this along with minVal when running the staircase locally (i.e., not online): The maximum value that the staircase will return (good for preventing impossible contrast values, for instance).
range (Use this when running the staircase online): This is the intensity difference between the largest and smallest value, centered on startVal. Be generous with the range so that you don’t exclude possible values for the threshold estimate.
Complete these fields as required for your experiment and click OK to save the loop.
Add as many staircases as you need to the conditions file.
Now that you have your conditions set up, you will need to use the estimates that are being produced by the staircase to control the particular aspect of the stimulus that you’re investigating (contrast, or opacity for example). To do this, simply use the variable $level as the value for that parameter and set every repeat!
Using a QUEST Plus staircase
QUEST Plus is an extension of the original QUEST procedure set out by Watson and Pelli (1983), by Watson (2017). Read the paper here for a complete explanation of the QUEST Plus procedure.
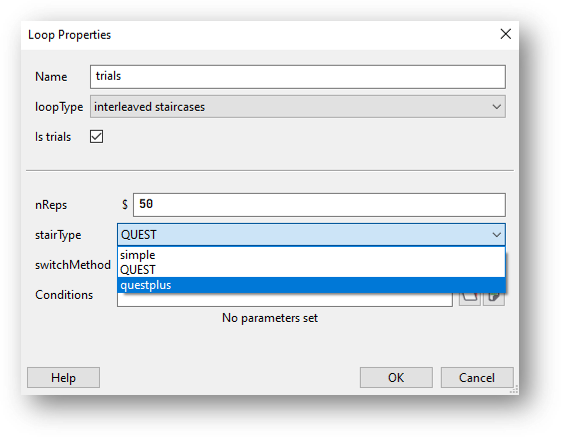
To add a QUEST Plus staircase, you’ll firstly need to add a loop around the routines you want to repeat. Then, from the loop type drop-down list select “Interleaved staircases” and “QUEST Plus” from the stair type drop-down:
Now, you’ll need to create a conditions file that contains the following column headers/variables:
label: The label given to the staircase.
nTrials: The number of trials to run.
intensityVals: The complete set of stimulus levels. These do not have to just be intensity, they can be contrasts, durations or weights etc.
thresholdVals: The complete set of possible threshold values.
slopeVals: The complete set of possible slope values.
lowerAsymptoteVals: The complete set of possible values of the lower asymptote. This corresponds to false-alarm rates in yes-no tasks, and to the guessing rate in n-AFC tasks. Therefore, when performing an n-AFC experiment, the collection should consist of a single value only (e.g., [0.5] for 2-AFC, [0.33] for 3-AFC, [0.25] for 4-AFC, etc.).
lapseRateVals: The complete set of possible lapse rate values. The lapse rate defines the upper asymptote of the psychometric function, which will be at 1 - lapse rate.
responseVals: The complete set of possible response outcomes. Currently, only two outcomes are supported: the first element must correspond to a successful response/stimulus detection, and the second one to an unsuccessful or incorrect response. For example, in a yes-no task, you would use [‘Yes’, ‘No’], and in an n-AFC task,`[‘Correct’, ‘Incorrect’]`; or, alternatively, you could use [1, 0] in both cases.
prior: The prior probabilities to assign to the parameter values.
startIntensity: The very first intensity (or stimulus level) to present.
stimScale: The scale on which the stimulus intensities (or stimulus levels) are provided. Currently supported are the log scale, log10; decibels, dB; and a linear scale, linear.
stimSelectionMethod: How to select the next stimulus. minEntropy will select the stimulus that will minimize the expected entropy. minNEntropy will randomly pick pick a stimulus from the set of stimuli that will produce the smallest, 2nd-smallest, …, N-smallest entropy. This can be used to ensure some variation in the stimulus selection (and subsequent presentation) procedure. The number N will then have to be specified via the stimSelectionOption parameter.
stimSelectionOptions: This parameter further controls how to select the next stimulus in case stimSelectionMethod=minNEntropy. The dictionary supports two keys:N and maxConsecutiveReps. N defines the number of “best” stimuli (i.e., those which produce the smallest N expected entropies) from which to randomly select a stimulus for presentation in the next trial. maxConsecutiveReps defines how many times the exact same stimulus can be presented on consecutive trials. For example, to randomly pick a stimulus from those which will produce the 4 smallest expected entropies, and to allow the same stimulus to be presented on two consecutive trials max, use stimSelectionOptions=dict(N=4, maxConsecutiveReps=2). To achieve reproducible results, you may pass a seed to the random number generator via the randomSeed key.
paramEstimationMethod: How to calculate the final parameter estimate. mean returns the mean of each parameter, weighted by their respective posterior probabilities. mode returns the the parameters at the peak of the posterior distribution.
Complete these fields as required for your experiment and click OK to save the loop.
Add as many staircases as you need to the conditions file.
Now that you have your conditions set up, you will need to use the estimates that are being produced by the staircase to control the particular aspect of the stimulus that you’re investigating (contrast, or opacity for example). To do this, simply use the variable $level as the value for that parameter and set every repeat!
In the standard Loop types you would use all the rows/conditions within your conditions file. However there are often times when you want to select a subset of your trials before randomising and repeating.
The parameter Select rows allows this. You can specify which rows you want to use by inserting values here:
0,2,5 gives the 1st, 3rd and 6th entry of a list - Python starts with index zero)
$random(4)*10 gives 4 indices from 0 to 9 (so selects 4 out of 10 conditions)
5:10 selects the 6th to 10th rows
$myIndices uses a variable that you’ve already created
Note in the last case that 5:8 isn’t valid syntax for a variable so you cannot do:
myIndices = 5:8
but you can do:
myIndices = slice(5,8) #python object to represent a slice
myIndices = "5:8" #a string that PsychoPy can then parse as a slice later
myIndices = "5:8:2" #as above but
Note that PsychoPy® uses Python’s built-in slicing syntax (where the first index is zero and the last entry of a slice doesn’t get included). You might want to check the outputs of your selection in the Python shell (bottom of the Coder view) like this:
>>> range(100)[5:8] #slice 5:8 of a standard set of indices
[5, 6, 7]
>>> range(100)[5:10:2] #slice 5:8 of a standard set of indices
[5, 7, 9, 11, 13, 15, 17, 19]
Check that the conditions you wanted to select are the ones you intended!
Once you have a loop around the routine you want to repeat, you can use the variables created in your conditions file to update any parameter within your routine. For example, let’s say that you have a conditions file that looks like this:
letter
a
b
c
You could then add a Text component and in the text field type $letter and then set the corresponding dropsown box to “set every repeat”. This indicates that you want the value of this parameter to change on each iteration of your loop, and the value of that parameter on each loop will correspond to the value of “letter” drawn on each trial.
Note
You only need to use the $ sign if that field name does not already contain a $ sign! You also don’t need several dollar signs in a field e.g. you wouldn’t set the position of a stimulus on each repeat using ($myX, $myY) instead you would just use $(myX, myY) - this is because the dollar sign indicates that this field will now accept python code, rather than that this value corresponds to a variable.